
In general, properly designed HTML is the most accessible format. PDF files are the most difficult to make accessible. It is recommended to use or link to PDF only when you cannot use HTML. The minimum requirements for a PDF document to be accessible is for it to be searchable text and “tagged” with hidden labels (“tags”) that describe the structure of the document so that it reads in the correct order with a screen reader.
Keep this in mind if you must convert a document to a PDF:
- Prep the Word document first so that it is accessible using the guides below.
- It is easier to remediate the source file within Word than to work with the PDF.
- PDF remediation requires Adobe Acrobat Pro, not Acrobat Reader.
- All CUNY staff and faculty can request Acrobat Pro/DC from their IT department.
Note: Microsoft Word 2011 for the Mac cannot produce a fully accessible PDF. A PDF made from Microsoft Word for the Mac does not retain the structure tags (headings, lists, table headers, etc.) from the original document. The most recent update to Word 2016 for Mac finally allows to export documents as tagged PDF.
List of Best Practices Creating an Accessible Word Document
- All documents must have descriptive titles.
- Sans serif fonts such as Arial, Helvetica or Verdana work best on screens. Use 12 point or larger.
- If you created a PDF from a scanned document you must convert the scanned images of text to searchable content using optical character recognition.
- The most basic requirement for a PDF document to be accessible is for it to be searchable text and “tagged” with hidden labels (“tags”) that describe the structure of the document.
- Use headings to structure and organize your document. Ensure that all heading styles are applied in a hierarchical manner. Only use headings with a name of Heading 1, Heading 2, etc.
- Include alt text for images, tables, and charts and graphs. Also include captions for charts and graphs.
- Do not format images and other objects as floating. Format objects as “In Line with Text”.
- Keep tables simple — do not use nested tables. Do not use tables for layout. Include column headings for tables and specify a header row for tables.
- Do not use tabs or spaces to create columns. Instead, use the Page Layout/Columns feature of your software.
- Use descriptive hypertext links.
- Use bulleted and numeric lists for related items.
- Include a table of contents for long documents (which Word can generate if you use styles).
- Avoid watermarks. If you must use one, make sure that the information it contains is also included elsewhere in the document.
- Be cautious as to the colors you choose. Some colors and color combinations can be difficult to read, especially for someone who has color blindness. Provide sufficient color contrast. Also, do not use color to solely convey meaning.
- Include closed captions or transcripts for any audio or video elements.
Creating an Accessible Word Document and Converting it to Accessible PDF
Paragraph headings (such as those you find in this document), provide not only visual cues to major topics, but they also provide a means for navigating the document by a screen reader. Paragraph headings are not individually formatted (e.g. larger font size, bolded, and underlined), but are formatted by using styles.
Headings should be applied to paragraph headings based upon their hierarchy within a document. For example, the following headings should be applied as follows:
- Heading 1 – Title of document
- Heading 2 – Major headings
- Heading 2 – Subheadings
To apply a style to a paragraph heading:
- Click the Home tab.
- Click on the paragraph that you want to style as a heading.
- From the Styles section of the ribbon, click on the desired style.

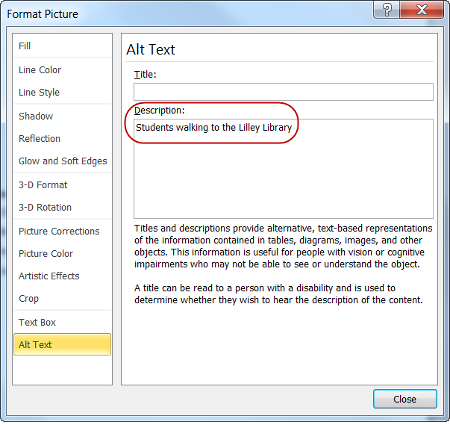
Images must have a description that explains the purpose or the content of that image. This description, referred to as alt text (or alternate text), is read by a screen reader.
To add alt text to an image:
- Right click on an image.
- From the menu, select: Format Picture. Click on the Layout & Properties button.
- From the category list, click: Alt Text.
- In the Description box, type a brief description.
- Click the Close button.
Do not type the alt text in the Title box.
For alternative text, do not use the phrases: “Image of…”, “Picture of…”, or “Pic of …”. They are redundant.
Alternative text should communicate the message conveyed by the image.
How to Create Good Alternate Text:
- Consider the content and function of your image.
- If it provides content to your document, make sure that the information the image provides is described in the alt text.
- Purely decorative images should have null alternative text
- Try not to use “Image of…” or “Graphic of…” as alt text. That is usually evident to the person reading the alt text.
- Do not repeat the information that is contained in the document itself into the alt text. If it is already in the document, that should be enough.
Although images must be in line, you can format the images to better control the placement of the image. To do so, use indents. (You can also create a style for images that will provide consistent indentation of all images. Generally, you will want to set the left indent and the spacing before and after the image.)
To set the text wrapping for an object:
- Right click on the object.
- From the shortcut menu, select: Wrap Text.
- Click on the following: In Line with Text.
- If needed, indent the line to place the image in the desired location.
Tables should include alt text as well as column headings.
Example of a table with column headings:
| NAME | MAJOR | SEMESTER STANDING |
|---|---|---|
| Nancy Johnson | Engineering | 06 |
| Mark Smith | History | 01 |
| Rita Brown | Biology | 04 |
| Ted Belle | Business | 08 |
To add alt text to a table:
- Right click on the table.
- From the shortcut menu, select: Table Properties.
- Click on the Alt Text
- In the Description box, type a brief description. Do not type the alt text in the Title box.
- Click Ok
Another feature that helps to make your tables more accessible to screen readers is the header row option. (Also, this option is useful for another purpose: If you have a table that splits across more than one page, it will repeat the column headings for every page on which the table appears.)
To add a header row:
- Type column headings in the first row of the table.
- Select the first row containing the column headings.
- From the Table Tools tab on the ribbon, select: Layout.
- Click the Repeat Header Rows
Charts and graphs also require alt text as well as a short caption.
To add alt text to a chart:
- Right click on the chart’s border.
- From the menu, select Format Chart Area. Select the Layout & Properties icon.
- From the category list, select Alt Text.
- In the Description box, type a brief summary that explains the chart.
- Select the Close button.
To add a caption to a chart:
- Right click on the chart’s border.
- From the shortcut menu, select Insert Caption.
- In the Caption box, type the desired text for the caption.
- Select the OK button.
- Format and position the caption as desired.
Lists of related items should be formatted using bullets or automatic numbering. This is important since a screen reader will announce that there is a bulleted list and then read those items. Often a list can be used as an alternative to a table when presenting information.
To create a list:
- Type each item on a single line.
- Select the group of items.
- Click the bullet or numeric bullet button.
Windows
Microsoft 365, Office 2021, Office 2019, Office 2016
- Before generating a PDF, run the Accessibility Checker in your document to make sure it is accessible to everyone. For instructions, go to Improve accessibility with the Accessibility Checker.
- When you’ve addressed the accessibility issues, select File > Save As or File > Save a Copy.
- Do one of the following:
- To save the PDF to the same location as the original file, expand the file type dropdown list under the file name, select PDF (*.pdf), and then select More options…. The Save As dialog box opens.
- To browse for a save location, select Browse. The Save As dialog box opens. Navigate to the location where you want to save the file, and then select PDF in the Save as type list.
- In the Save As dialog box, select Options.
- Select the Document structure tags for accessibility checkbox, and then select OK.
macOS
Microsoft 365 for Mac
- Before generating your PDF, run the Accessibility Checker to make sure your document is easy for people of all abilities to access and edit.
- Press Command + Shift + S and type the file name in the Name text box, and select the Place.
- In File Format, use the down arrow to browse through file types and select PDF.
- Select Best for electronic distribution and accessibility (uses Microsoft online service). This ensures the PDF is tagged.
- Select Export.
Note: PowerPoint for macOS doesn’t preserve hyperlinks in PDFs but if you save your presentation to OneDrive you can open it in PowerPoint for the web and download as PDF from there. PDF files generated from PowerPoint for the web preserve hyperlinks and also tend to have a smaller file size.
Web
Microsoft 365 for web
- Before generating your PDF, run the Accessibility Checker to make sure your document is easy for people of all abilities to access and edit.
- On the ribbon, select the File button.
- Select the Save As option.
- In the Save As pane, select Download as PDF to open the Microsoft Word for the web dialog box. You’ll see a link to download your PDF document.
- Select Click here to view the PDF of your document and then press Enter.
- In the notification panel, find the name of your document under Current downloads, and do one of the following:
- To save in the default location, choose Save.
- To save in a different location, press Save As. In the Save As dialog box, you can type a new file name and choose the folder you want. Click the Save button.
- If you want to open the document or the folder, choose the option you want in the notification bar.
If you must use a PDF, the easiest method is to use accessible source documents and convert them to PDF. If you created a PDF from a scanned document, then it will be inherently inaccessible to screen readers and other assistive technologies. The document will also be less useful because graphic representations of text cannot be selected, edited, or searched.
In this case, it is necessary that you first convert the scanned images of text to searchable content using optical character recognition (OCR) before addressing the accessibility features of the document.
The second basic requirement for a PDF document to be accessible is for it to be “tagged” with hidden labels (“tags”) that describe the structure of the document (e.g. that text should be interpreted as a header, paragraph, table cell, etc.). Screen readers can use these tags to convey the document’s information effectively to people with visual disabilities.
The other requirements for a PDF document to be accessible (alternate text, logical reading order, etc.) can only be added once the document is tagged.
Make Image or Untagged PDFs accessible
In Acrobat Pro, select Tools from the upper right corner, then select Action Wizard > Make Accessible from the sidebar. By default, the action runs on the document that’s currently open. Select Add Files to select additional files or a folder to run the action on. Select the Start button. This will walk you through a series of steps to enhance the accessibility of your document:
- Add Document Description — Enter a descriptive document Title. Other fields are optional.
- Set Open Options — Runs automatically.
- Recognize Text using OCR — If your PDF contains images of text, it will be converted into true text during this step.
- Detect Form Fields — Skip unless your page contains fillable forms.
- Set Tab Order Property — Runs automatically
- Set Reading Language.
- Add Tags to Document — PDF “tags” provide accessibility information to screen readers. If your document does not have tags they will be added during this step. [Advanced users can check the quality of these tags later on.]
- Set Alternate Text — A window will appear that allows you to add alternative text to images. Use the arrow buttons to move between images and check “Decorative figure” if the image should be ignored by a screen reader.
- Run Accessibility Full Check- This checker will show additional issues. Right click errors and warnings and select Fix to address the issues, Skip Rule if the issue has been addressed, and Explain to read online help. You can also run an on-demand check under Tools > Accessibility > Full Check.
In addition to Full Check, Acrobat provides other methods to check PDF accessibility:
- Use Reflow view (View > Zoom > Reflow) to quickly check the reading order.
- Use Read Out Loud (View > Read Out Loud) to experience the document as readers who use the text-to-speech conversion tool experience it.
- Advanced users can use the Touch Up Reading Order tool, Order, Tags, and Content panels to examine the structure, reading order, and contents of a PDF.
Accessibility in PDF files can be complicated, even more so with PDF forms. In general, HTML forms are easier to create, edit, and manage. Compared to HTML, PDF forms have some inherent accessibility limitations. There is no real way to associate the visible text label with the form field, but there is a way to provide a text description that will be read to a screen reader while navigating through the PDF.
If you must use a form in PDF format, it should be accessible to all users. Users should not be required to print and manually fill forms, since this may present barriers for users with visual and mobility issues. Allow users to complete your form electronically by following the steps and guides below.
In addition to following general PDF accessibility principles, the following steps are required to ensure the accessibility of a PDF form:
- Create a form using the original authoring tool (like Word). Use the legacy form controls and follow the general Word guidelines. Use underlines to define text form fields.
- Save the Word document as an Adobe PDF using the directions above.
- Use Acrobat Pro to make form fields interactive. Here’s how:
- Automatically detect and markup form fields (Tools > Forms > Create) or Prepare Form in Acrobat DC
- Manually add or edit any form fields that weren’t correctly detected
- Check all labels (Tooltips); repair if needed
- Check group labels and options for radio buttons and checkboxes; repair if needed
- Finishing touches:
- Tools > Accessibility > Autotag Form Fields
- Tools > Accessibility > Autotag Document
- Repair tags as needed
- Check tab order; repair if needed
- Tools > Accessibility > Full Check
- Fix any found issues
Good guides for content creators include:
Accessible Forms in Acrobat XI from WebAIM, Creating Accessible PDF Forms Using Adobe Acrobat Pro, and Creating accessible PDF forms with Acrobat Pro DC
The following tips will help make your PowerPoint presentations more accessible:
- Use built-in templates and layouts.
- Give each slide a unique title.
- Add alternative text descriptions to images.
- Use bulleted and numbered lists.
- Avoid the use of text boxes (use content placeholders on template layouts instead).
- Tab through each slide to ensure correct reading order.
Creating accessible PowerPoint presentations from Microsoft
How to Use PowerPoint to Create Live Subtitles and Translations is a 5-minute PowerPoint tutorial about how to use PowerPoint to live caption lectures so their students can read along. It also shows faculty how to download a transcript of their live lecture, which they can also share with their students.
- WebAIM Guide to Creating Accessible Microsoft Word Documents
- Detailed tutorial for Creating Accessible PDF with Adobe Acrobat Pro
- Creating accessible PDF documents with Adobe InDesign
- WebAIM guide to accessible PowerPoint files
- Microsoft Series “PDF Accessibility Training” videos
- Adobe videos on accessible PDFs